How to Use Gutenberg Editor
 UltaBlocks Guide
You can also read other articles in our Guide:
Are you feeling a bit anxious about the upcoming release of Gutenberg, WordPress’s new page editor? Perhaps it’s already arrived and you’re scrambling to catch up and learn how to use this radically new system? You’re not alone.
The UltraBlocks team is here to get you up to speed and give you the knowledge you need so you can move forward and keep publishing compelling content on your site.
As part of our Comprehensive Guide to Gutenberg, we’ll show you how to use the new Gutenberg editor in WordPress 5.0 and give you some tips and tricks that will help you create more visually appealing posts in less time.
In this article, we’ll just be scratching the surface as we show you how to create posts, which you’ll spend the majority of your time doing. However, Gutenberg has a lot more under the hood that requires some basic programming skills and knowledge of PHP and Javascript.
If you’re interested in creating and editing your own custom Gutenberg blocks, please check out the rest of our articles in our Comprehensive Guide.
In the meantime, let’s just focus on using the editor before we get to higher level topics.
OK, let’s dive in!
Basics of Gutenberg Editor
If you’ve read our previous article on WordPress 5.0 & Gutenberg, you know that the new Gutenberg editor utilizes “blocks”. Blocks are made up of PHP, CSS, and Javascript that have been written beforehand, so you don’t have to do all the coding yourself.
Unlike the previous TinyMCE editor, Gutenberg allows you to simply drag and drop elements onto your website like you would with a page builder. This is intended to make building your website extremely quick and easy, saving you the time and hassle of writing lines of code.
Each element is treated as a completely separate object, so you’ll find a different block for each paragraph, one for each header, and so on. Gutenberg keeps your content clean and organized by preventing you from mixing elements of different types within the same block.
Let’s take a look at the interface and the various block options that we get on Day 1 with the WordPress 5.0 update:
Using the Interface
The Gutenberg editor’s interface provides you with quite a few options to create and customize your posts. These options include:
- Create A New Block
- Undo/Redo Changes
- Post Settings Sidebar (Categories, Tags, Featured Images, Publishing Date, etc.)
- Individual Block Settings (text color, font, style, size, etc.)
- Preview Post
- Publish Post
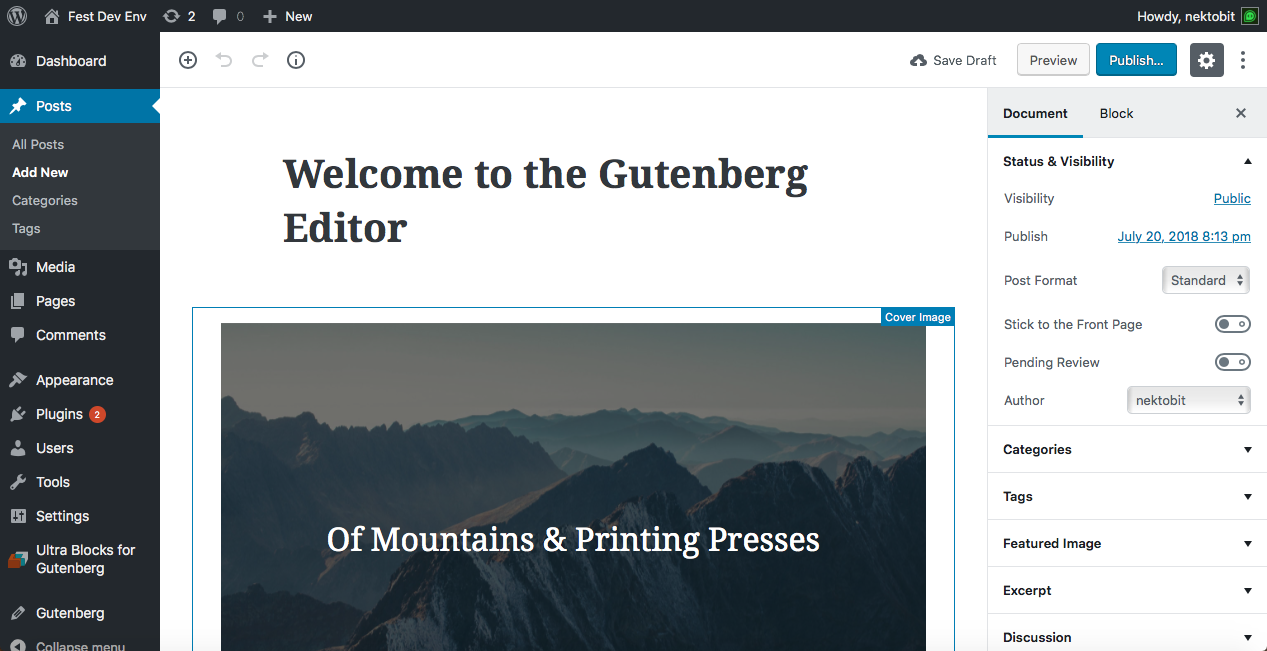
When you’re ready to begin writing, you’ll have to click the “+ New” button to open a new page or post in the top.
Upon arriving at the blank page you’ll see a lot of familiar settings from before, such as Undo/Redo changes, Preview Post, and Publish Post.
In the sidebar, we then find some more advanced options that allow you to adjust either the post or individual blocks. You can also view the publish date, author, format, categories, tags, and other various details related to the post.
The second tab in the sidebar deals with the block settings, which includes basic text editor functions, like text color, size, and background color. You can also adjust the block type, which we will discuss in just a moment.
You’ll be using these options a lot during your time with Gutenberg, as they are the first steps towards creating great content. Unfortunately, knowledge of these basic options won’t really allow you to do much with your posts.
The true power of Gutenberg lies within the Block Types, which allow you to determine how the editor views each element and gives you tons of customization options.
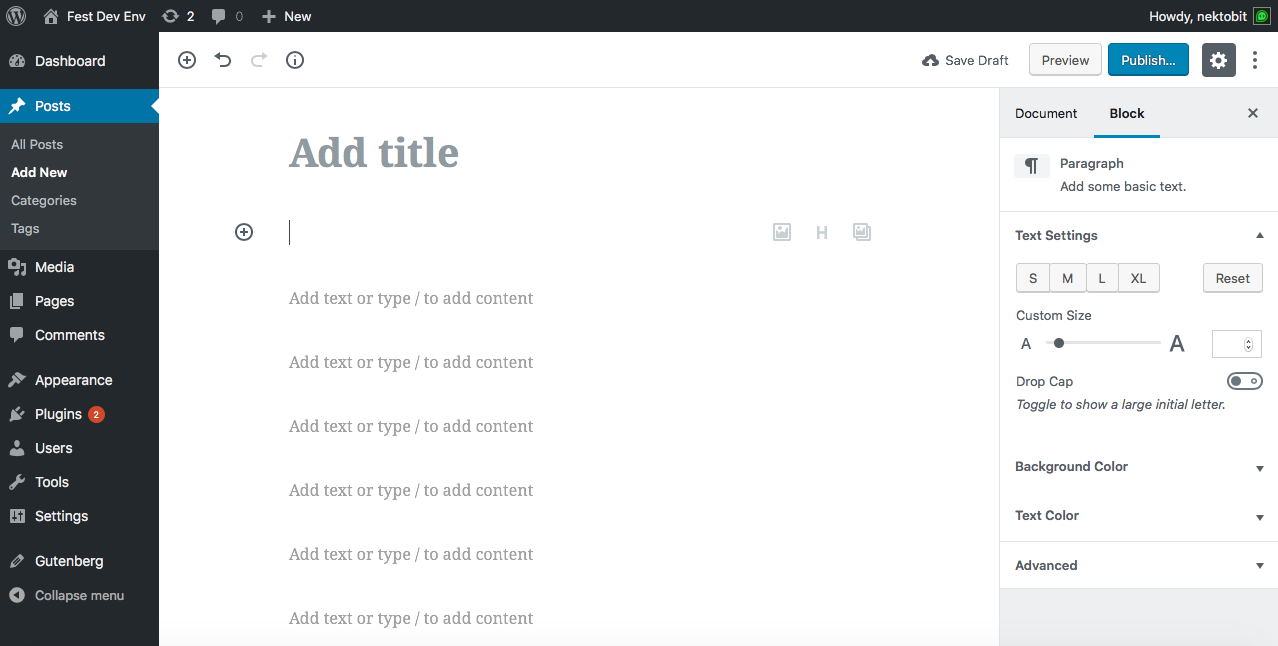
When the blank page appears, you’ll be able to see a large title block that says, “Add Title” and a smaller block below it that says, “add text or type / to add content”.
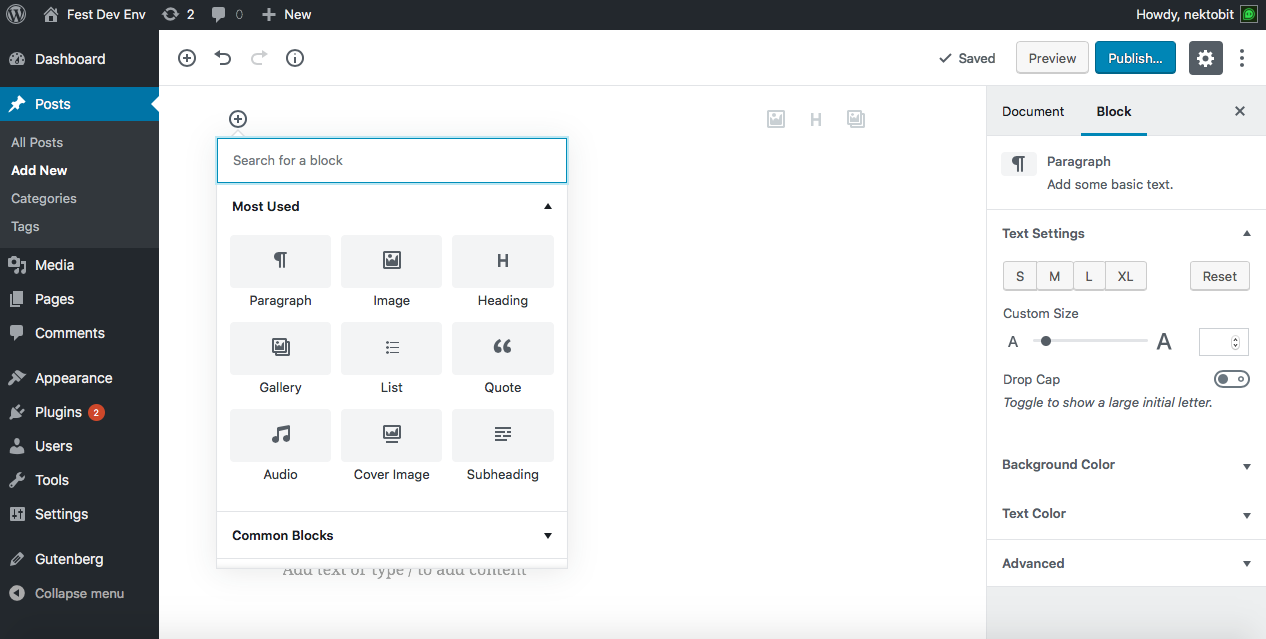
Hover over the block and you’ll see a round button with a plus mark inside that says, “add block”. Go ahead and click on it to create a new block and choose the block type.
Block Types
Basic block types serve a lot of the same purposes that simple HTML tags do, except they are presented in a more visually appealing manner. Rather than using <title> tags or <p> tags, you can simply select a title or paragraph block to automatically generate those tags.
Other more advanced blocks come with CSS and JavaScript built in, providing you with additional style and functionality.
Gutenberg already comes with a host of different blocks that allow you to customize your posts. The editor is pre-loaded with multiple block types, such as:
- Title
- Heading
- Paragraph
- Quote
- Image
- List
- Video
- Embeds
- and more…
Each of these blocks are rather self-explanatory; they remove the need of coding and simplify the process of adding elements to your page. Instead of writing out the corresponding HTML tags, you can simply drag and drop an image, heading, paragraph, etc.
If those aren’t enough customization options for you, check out our home page and see the custom blocks and features that the UltraBlocks plugin has to offer.
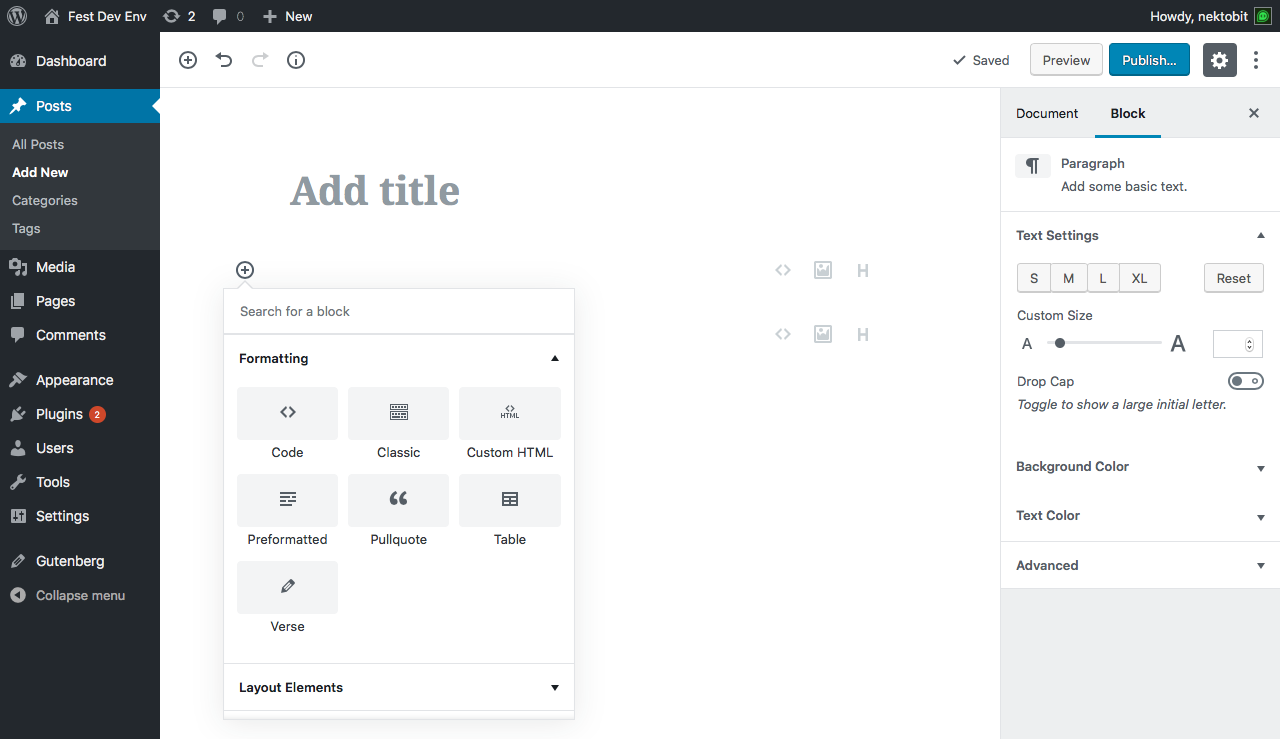
Style & Formatting
In addition to content blocks, Gutenberg provides you with a lot of options when it comes to stylizing and formatting your posts.
In the Style & Formatting section, we have:
- Code
- Classic
- Custom HTML
- Preformatted
- Pullquote
- Table
- Verse
The Code formatting option allows us to display an example of code in a way that doesn’t affect our website and works great for tutorials. To perform this same function in HTML, we would have to write the following:
<pre>
  <code>
    This is how we write it in HTML.
  </code>
</pre>
The Classic formatting option gives us the choice of using the classic WordPress editor in the form of a block! This is quite a clever way of appeasing die-hard fans of the classic editor and should help out those who are still learning Gutenberg.
Just like before, we have the option of inserting our own Custom HTML code to add a little bit of flavor if one of the current Gutenberg blocks won’t do the job. This is completely optional and gives those experienced in writing HTML more control over their posts.
The Preformatted option allows us to format our text using Bold, Italic, and Strikethrough options and respects the spacing and tabs of your post. Despite their simplicity, these formatting options make your writing much more dynamic.
The Pullquote option highlights an important quote or statement in your article and makes it stand out. These stylized quotes are often referred to as “call-out quotes” and draw your reader’s attention to the most important parts of your writing.
“Pullquotes are great for editorials and news articles.”
-The author of this blog
Tables are great for organizing complex data and charts, making it easier to understand for readers. You could use tables for displaying financial information, cooking recipes, survey responses, and more.
| Ranking | Uses for Tables |
| #1 | Organizing Complex Data |
| #2 | Displaying Financial Information |
| #3 | Giving Step-by-Step Instructions |
| #4 | Showing Survey Responses |
Finally, we come to the Verse formatting option. This format is perfect for displaying famous proverbs, thought-provoking quotes from literature, haikus, poetry, and Bible verses.
For God so loved the world
that He gave His only begotten Son,
that whoever believes in Him
should not perish
but have everlasting life.
- John 3:16
Layout Elements
In the Layout Elements tab, we have:
- Button
- Columns
- More
- Page Break
- Separator
- Spacer
- Text Columns
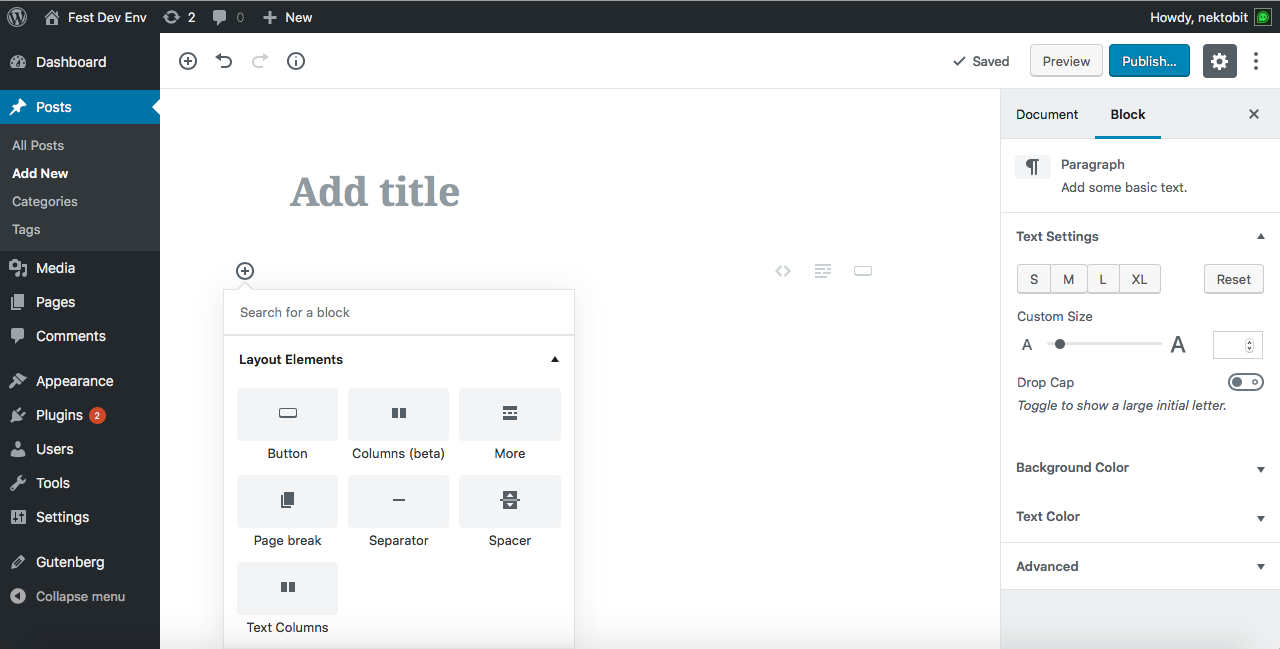
Buttons add interactivity to your site and allow you to start scripts on your site. This is where JavaScript starts to come into the equation. Gutenberg blocks simplify this problem when we would normally need to use JavaScript to tell the button to send a form, take us to a link, run a certain program, etc.
The Columns option is actually quite interesting. It allows you to squish two Gutenberg blocks into the same row, helping you take advantage of the space on your site. It also provides a great formatting option for news sites and journals that use a two-column format in print.
The More element allows you to hide part of your post and expand it when clicked on. By default, the text will say “read more”, but it can be customized to your tastes. A smart way to display multiple blog posts on one page, while giving your readers the options to expand the post.
The Page Break option allows you to split your posts into multiple pages, rather than one continuously scrolling page. If you can find a useful application for this option, please let us know in the comments.
The Separator creates a nice horizontal line in your posts to break things up visually. An important element for splitting up long, exhausting posts like this one.
The Spacer does exactly what you would expect it to do; it creates space. Gutenberg blocks don’t come with any default options for spacing, so this element allows you to create custom spacing between blocks by pixel count.
Text Columns work just like the previous columns option, yet they are limited to text only and cannot be customized by block type.
One interesting part about Gutenberg blocks (that we’ll address in our next article) is that they store many non-HTML elements in the HTML comments area of your code. This preserves the settings of your blocks and allows the Gutenberg editor to read your HTML and determine how a block behaves within the editor, while keeping it separate from the code.
In other words, a website created in Gutenberg will feature “invisible” code written in the HTML comments that allows the editor and reader to understand exactly how that site was made.
In our next article, we’ll examine the language of Gutenberg and we’ll show you how to create your own custom blocks in the new editor.
Writing Blog Posts
Before moving on to building custom blocks, we encourage you to spend some time playing with Gutenberg and experimenting with everything the default editor has to offer.
As you spend time using the editor, you’ll develop a deeper understanding of how blocks work and how to create beautiful, engaging content in a flash.
Go ahead and try creating your very own blog post in Gutenberg!